|
My first delivery contained the mCubed hFX case, vertical silence, motherboard, CPU and memory. 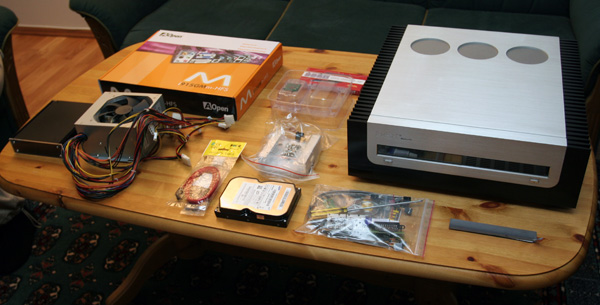
The first package is always the most exciting one. :) I already had a few things lying at home, the Samsung 250 gb HD, sata cables and a 350 watts Fortron Source PSU. The PSU is a 3 year old one that was once very silent but now seems to generate a bit too much noise imo. The new totally silent PSU will definitely help out here. :) 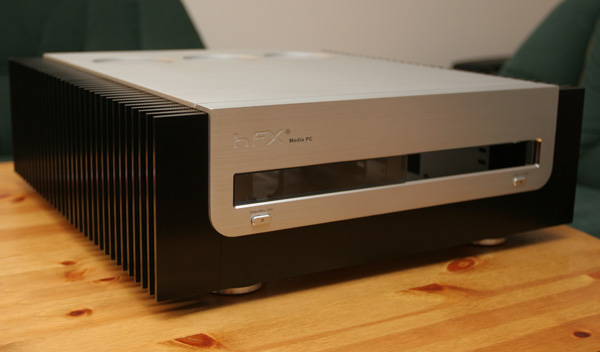
I really like the silver/black finish on the hFX case. So who reads the manual anyway? The case looked cool so I had to open it and start installing right away! So I did everything completely wrong! :) I started off with the brackets for sound and scart on the back. I am not going to use these, but just wanted them in there to fill those holes there. I actually took a peek in the manual and it told me to install some spacers. The only ones I could find was the ones used for the motherboard it seemed, so I tried those assuming that was the ones they needed to then fasten the bracket with some longer screws. Had some problems getting them into the holes as the screw threads didnt fit. After installing them all I realised that this was all wrong, and I searched the kit some more only to find some dedicated screws and bolts to fasten this bracket. Well, out with the screws again and then I saw that no spacer was needed, you could just add the bracket there to the back and then add the screws and bolts. So the manual was kinda hinting me in the wrong direction from the start. So I definitely didnt want to read any manual now!!! Next part was to add the PSU (I thought), so I soon realised that this case doesnt have much room at all. At first I was kinda pussled by the placement of the PSU, quite far in the front there with no exhaust for a fan or anything. The PSU is actually mounted so that if you have a fan it sucks air from the bottom and into the case. As the PSU gets hot you are actually just blowing hot air into the case. You would be smart to reverse the fan direction so that it blows out, so you need to modify your PSU in that case. For me it was only a temporary solution until the Silverstone passive PSU had arrived. Ok, the PSU has to be held in place by a bracket that is fastened with quite a number of screws, both to the case and to the PSU itself. The brackets actually holds the PSU to the side of the case so that heat from it is lead through the giant heatsinks on one of the sides. So in a passive cooling setup it should at least get some of the heat out quickly. 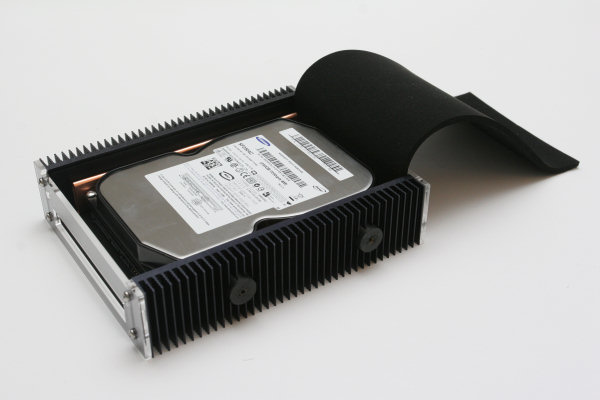
The vertical silence hard disk casing with the Samsung Spinpoint P120 inside (250 GB). I then started mounting the drives. First the harddrive had to go into the Vertical Silence, which seems like av very sturdy and effective construction for leading the heat of the Harddrive out to the sinks on the sides of the Vertical Silence, while still having rubber connections to the case to reduce vibration. The DVD drive, an old Asus one I had went underneath the harddrive and is fastened the same way you fasten any drive inside a case. So then this bracket has to be fastende to the case again. After this I wanted to check out the acrylic glass that I am supposed to fasten so that the drive drawer is alined with the front and looks like a part of the glass stripe. Its then I realise that my Asus drive is curved on the front so there is no way the rubber sticker thingy can be attached (you first has to attach a black rubber adhesive thingy, then attach the acrylic glass onto this). So for this to work I have to either: 1) sand down the front of my drive - 2) buy a new one that has a flat drawer front. I would eventually choose 2 simply because some more testing revealed that my old Asus DVD drive was actually getting ready for the bin. More about that later. For now I chose to pospone fastening this acrylic front and just install the rest to get everything up and running. 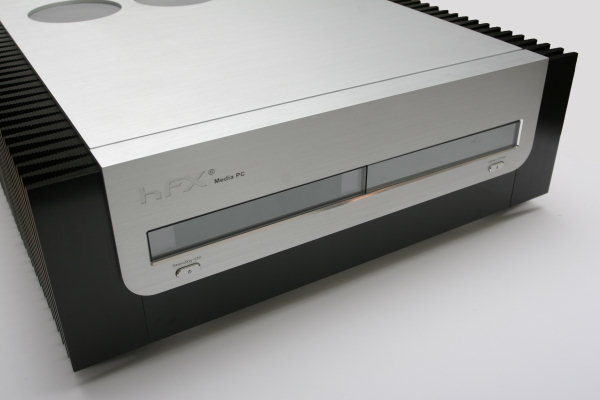
You can see the acrylic glass where the display is supposed to be and drive to the right. It so happens I took a quick peek into the installation manual and realised that I was supposed to have installed a small board with some leds behind the acrylic in the front just behind the PSU. Oh well, everything had to go out of the case again, drives as well as the PSU. Once this was fastened with the cables (one led for power and one for harddrive activity) I then refastened the PSU and drives. And now for the motherboard! First I added the spacers in the correct place so that they would fit the holes on the motherboard. I am very happy that at least this is very standardized in the computer world. But then you realise again how tight this case is. The card barely fits the free depth of the case, almost touching the drive brackets. And the power cable to the motherboard is jammed under the DVD drive there so you have to bend it quite a bit. Since the cables come out of the PSU toward the front of the case you actually have to have them go under the DVD there. Its really tight, and since my Fortron Source PSU dont have these nice "socks" to keep the wires together, it got pretty cramped with wires everywhere. The same goes for the IDE cable to the DVD drive, its a very tight fit there, but fortunately AOpen supplied some very nice wires to lessen this problem. Well, once the motherboard was in place, I then installed the DDR2 memory sticks with no problem. Also the Pentium M processor is very easy to install - just open the socket with one screw - pop in the CPU and then tighten screw to fasten it. Then it was time for adding the supplied CPU cooler from AOpen since I still hadnt gotten the heatpipe cooler I was going to use. And again I realised that I should have done a tiny bit of research before I started. The cooler needs a bracket that is mounted under the motherboard! Silly me... So I had to take it all out again to mount that bracket, or actually you just have to hold it in place while you screw on the cooler on top of the CPU. I used a thin layer of Arctic Silver 5 paste on the CPU die to make it cool better. I then remounted the motherboard and plugged in all cables again, getting ready for the first boot! :) 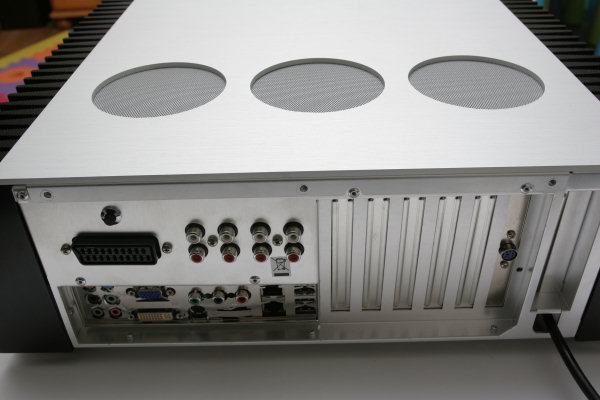 The back of the case with 3 venting holes on the top. The system booted fine and I went into the BIOS to have a look at the settings, and especially the CPU temperature to see if the cooler was properly attached. It seemed to idle at around 50 degrees, which I found way to hot for a CPU that consumes so little power! The supplied CPU cooler is a joke i my opinion. My CPU is the slowest of the Pentium M series you can get now! Also, the fan on this cooler is very noisy and I am really looking forward to getting that passive heatpipe cooler. Still, its my PSU that is making most of the noise at the moment. I would have to do some more testing on CPU heat eventually, but first I had to install the OS. Windows XP installed fine and I was up and running in a short while. I installed some service packs and downloaded some WMV HD movie clips just to try it out on the new 40" Sony television. The movies played fine and the high resolution is really something to experience! I for one is really looking forward to getting my hands on more HD material. The next thing I wanted to test out was to install the trial version of Meedio as I still hadnt made a purchase yet. It installed fine and I also added some plugins I wanted to try out. The demo version of the Nvidia codec was also downloaded, and I tried playing a DVD in Windows Media player first. This codec is excellent, and seems to cope very well with scaling in both resolution and time (pulldown). I watched some of the last Lord of the Rings movie and liked what I saw. :) But if life was only that easy... :) I then wanted to play movies from within Meedio and found that I didnt get any sound! After some heavy googling I realised that the Nvidia codec doesnt play sound when used inside third party applications, only inside Media Player. What a bummer! It might be that only the demo version didnt work or something. I eventually researched on the Meedio forums, asking about this problem, where someone was kind enough to tell me that you could use a free AC3 codec for sound and the Nvidia one for video. This was done by using a .meegraph file, a file I dont understand anything of, but someone was kind enough to supply me with. After this, sound was working fine too from the DVD player! I started ripping some of my CD collection only to find out that my old Asus DVD drive was failing terribly at some cds, up to the point that it made XP think that it should revert it to PIO mode (hidden feature in windows XP). This I realised the moment I had rented a video and wanted to enjoy it on my new htpc only to have it jump and skip terribly for me. Frustrated I had to google for what had happened, where I found this secret feature of XP when DVD drives have a lot of errors in their reads. I uninstalled the second IDE channel, rebooted and got the channel reinstalled so that I could set it to DMA mode again. Things like these can really ruin your day. Who ever said htpcs were easy? :)  Bending the eject button extension thingy was not easy... I eventually ordered a new DVD drive, a NEC DVD burner that works brilliantly, and rips CDs at a blazing speed too without any errors. I made sure to get a black one so that it fits the design of this case. The new NEC drive also had a flat drawer front so that I could attach the acrylic glass. Well fastening it was pretty easy to do, just cut the black rubber adhesive thing to fit the front of the DVD drawer. Close the DVD, use a cardboard guide under the drawer and push in the acrylic glass till it is fastened. Well, then you see that the whole glass is totally misaligned with the rest of the glass in front. The glass was too far in, and unfortunately the only way to adjust this is to take out the whole bracket for the drives (5 screws), and then loosen 4 screws that hold the drive, move it a bit forward, fasten these screws and then remount the bracaket in the case. You have to do this a couple of times until the glass is aligned. And then I saw that the eject button on the DVD drive was being held in all the time by the button on the case. The DVD was too close to the front actually. While there was some small rubber stickers to extend the length of this button there was no explanation to how I could shorten this. I really wonder how they didnt notice this problem in the construction. I had to use a pair of pliers and bend the extender a bit to make its reach shorter. This was by all means no easy feat since the metal is very hard and I kept bending the place where the eject button was fastened so that the button wasnt flat anymore from the front (angled). It was a real pain to get this thing working, spending a good hour just to install the DVD drive in this case. In other words, a total lack of practical design here! 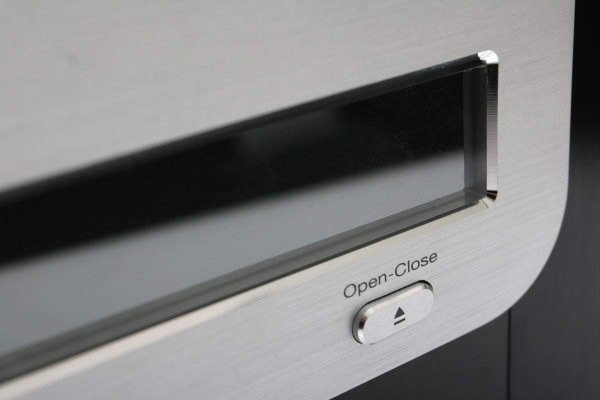
So much work just to get this little button working. Written by John Christian Lřnningdal - March 2006 |
||||