As mentioned so many times before, the case is pretty packed so you have to remove almost everything
when you need to do something with the motherboard. So the drive cage had to go out with the drives first.
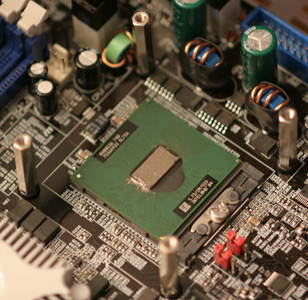
Unplugging some cables to make it easier to remove the motherboard is also adviced. Removed motherboard
and removed the AOpen cooler. The Borg 479 Heatpipe cooler uses the original AOpen bracket that came with
the motherboard. You first have to fasten the four screws through holes on the motherboard to the bracket
on the underside. Each of them has a little rubber o-ring to ensure that there is no short-circuts or just
being gentle to the motherboard. The CPU has to be cleaned so you dont have remains of the old paste on it,
and then reapply a very thin layer of paste again. In my case I used Arctic Silver 5 which I have good
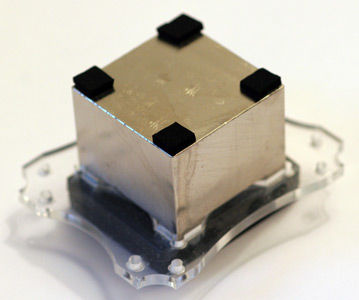
experience with on my desktop. The rather heavy cpu block first needs some small foam pads on the edges
to lower the pressure on the CPU when you tighten it to bracket screws. Then I put the CPU block on top
of the CPU and fastened the long screws, with some rubber o-rings there too. Now, the biggest problem here
is how far should you fasten the screws? Its obvious from the lenght of these screws that you can probably
screw them all the way down and BREAK YOUR CPU! So I just tried to screw them a bit down and make sure that
every screw was equally far down, hoping that there was enough contact with the cooler. I guessed that the
performance of the cooling would show how effective it was.
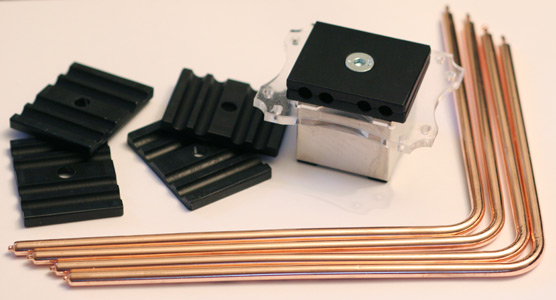
The whole cooler kit, cpu block, 4 heatpipes and 2 heatpipe brackets.
The next part was the fastening of the heapipes. At first I thought that this was going to be difficult
as there is no real way of fastning the heatpipes until after you have added them all and then used the
brackets to hold them in place. But since you have to apply the thermal paste (supplied in the kit) you
soon realise that the goop is so sticky that it can act as glue as you add the heatpipes. Naturally each
heatpipe has to be bent somewhat to fit the bracket that is fastened on the side of the mCubed case, so
its wise to do this bending before you start applying any thermal paste. I then used the paste, attached
the heatpipes and fastened them with the brackets (also applying thermal paste on these). If you are a
bit careful with the paste you dont have to make a mess, although it can easily get a bit gooey there.
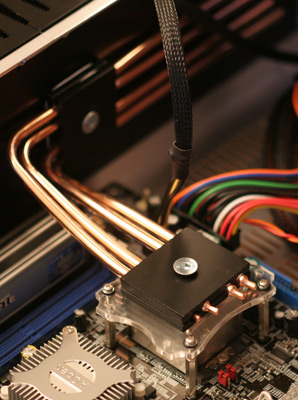
The 4 heatpipes installed!
After fastening the motherboard, installing the drive cage and plugging in all cables, came the
moment of thruth! Powering up the system resulted in a terrible alarm going off!!! The Bios was
complaining bit time! At first I powered it off, thinking that the CPU was instantly overheated,
but realised that couldnt be so. So I powered it up again, and entered the bios to check things out.
According to the temperature readings it was idling at around 35 degrees! Excellent in other words!
But the alarm was screaming, and I had to find a way to turn it off. It seems the AOpen bios dont
like it when there is no fan attached to the motherboard, and I couldnt find anywhere to turn this
alarm off. So i powered down, removed the fan from the old heatsink and plugged it in the motherboard.
The fan had to rest on top of the heatpipes, and it spun up the moment i powered up the system.
Fortunately the Bios has an option where the speed can be controlled. So I thought I'd configure it
so that it would only spin up once the heat reached 70 degrees. After setting this, the fan stopped,
and there was silence! :) Well, besides the harddrive which I could barely hear a small hum from
the system was dead silent! The CPU was idling at 35-36 degrees inside the bios with no sign to
climb any higher with the case open! :)
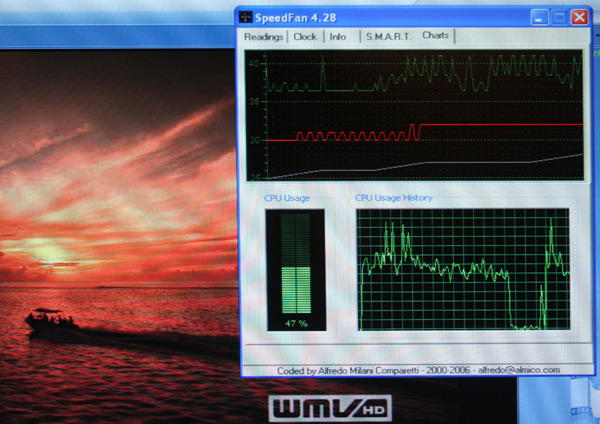
WMV HD playing in the background, very nice performance from the system indeed!
The system booted to windows xp fine and silently and everything was running smoothly. I immediately
tried adding some load to the CPU by starting up a WMV HD (720 lines) in mediaplayer at full screen,
and then checked out the temps in the SpeedFan application as well as the CPU load. As you can see
on the screenshot, playing back a WMV HD uses around 50% of the CPU, and remember I am not using
any hardware acceleration of VMR9 here - the graphics card is yet to be installed. The temps are
very nice too, the topmost (green bar) showing the CPU at around 40 degrees, the system temp at
about 32 degrees, and the harddrive slowly climbing (here at 33 degrees). The HD temp will keep
on climbing up to 48 degrees, drawing both the system and CPU temps up a bit. Normally my CPU
idles at 44 degrees after 12 hours. The temps depend a lot on if the hd is spinning or not. So
I have set the power options to spin down the HD after 30 minutes of idling. Just have to make
sure you dont have apps in memory that use the hd unecessarily.
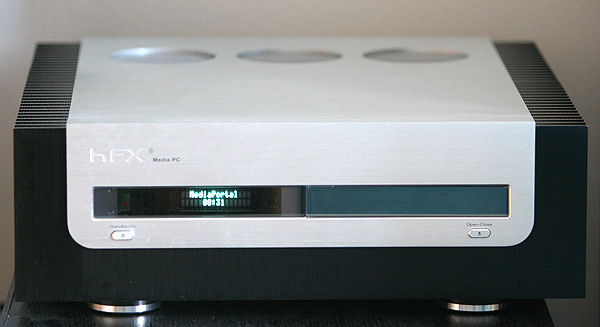
Silent running with MediaPortal frontend updating the VFD display.
It is clear that this system is expecting better than I could ever have hoped. And there are still
some things that can be done. I am considering swapping the drive for a 2.5" drive since they are
more silent and run a bit cooler than a 3.5". In time when prices have come down I am quite sure
I will swap this for a solid state based system, totally silent! Also, I have yet to install the
GeForce 6600gt, and when I do I will also use a Borg heatpipe cooler for that. It will be awesome
to be able to play some nice 3d games on this rig some day, although I have already tried running
World of Warcraft with the onboard GPU, which works fine but with low details and effects as well
as low fps. In a period of one year I am quite sure I can add a cheap card that will give me the
performance of an XBox360 while still being a complete media center and general purpose PC that
is totally silent!
More coming in a while...
Written by John Christian Lřnningdal - April 2006